+-+-+-+-+-+-+-+-+-+-+-+-+-+-+
|b|a|d|c|y|c|l|i|s|t|.|c|o|m|
+-+-+-+-+-+-+-+-+-+-+-+-+-+-+

  • Re-visiting the 3×1 drivetrain

    Recently I’ve been seeing a few posts here and there about these rather fringe drivetrains. I think they’ve become more common in the last 5 years, the so called 3×1 or 2×1. I remember going down the rabbit hole about them years ago. They’re by no means a new thing, I remember people, going back over a decade, talking about setups like this on MTBR and various other bike forums. It was usually brought up in relation to someone riding singlespeed, who then decided that they’d actually like just one more gear… or two… or three. And that always made me chuckle, when people suggest that it is an alternative to riding singlespeed, or worse, a more advanced and capable variation on a singlespeed bicycle. So, that’s what we will be exploring in this post.

    For a long time most of my bicycles were exclusively singlespeed. I admit bluntly that a big part of the reason was that I was rather lazy and hated anything to do with drivetrain maintenance and adjustment. I thought it was a waste of time and I seemed to be pretty happy mashing away at the pedals. I feel that there is an intrinsic beauty to a singlespeed bicycle. The clean look and knowing that it’ll just keep on working no matter what you throw at it. It became a bit of a ritual at that point, to obtain a new (old) bike and instantly rip off anything to do with the gearing. But there’s a crucial thing to recognise in what I just said there. I removed parts to realise a singlespeed bicycle.

    See what I am getting at? If you’re putting parts on which were required for a geared bike to function, and you add one or two more gears, well… You’re running a multi-geared bicycle! One could argue that, if the frame had vertical dropouts, it would be running a tensioner anyway – and how far removed is a tensioner from a derailleur really? Not very. So, yes, I can see how that could lead to a natural decision to go, “Well, might as well”, and add a front derailleur into the mix. And suddenly you’ve got a stripped down multi-geared pseudo-singlespeed bicycle which has none of the range with all of the problems of a fully geared bicycle. You’ve got two components that can fail and you still need to mess with cabling to shift that front mech, how’s that for a robust, low maintenance “singlespeed drive train”? I am aware that in saying this I am kind of throwing singlespeeding brothers and sisters with their tensioners under the bus. But I think we have to realise that running a tensioner is a bit bodgy and the ideal will always be track ends/horizontal dropouts or an eccentric bottom bracket/hub. The tensioner is just another potential point of failure, and if you’re riding in tall shrubbery and mucky terrain you’ll soon realise it is almost as prone to clogging up or snagging as a classic derailleur. That said a singlespeed bike, with a tensioner, is of course still singlespeed. It doesn’t shift and therefor wear less, resulting in lower maintenance and cheaper consumables.

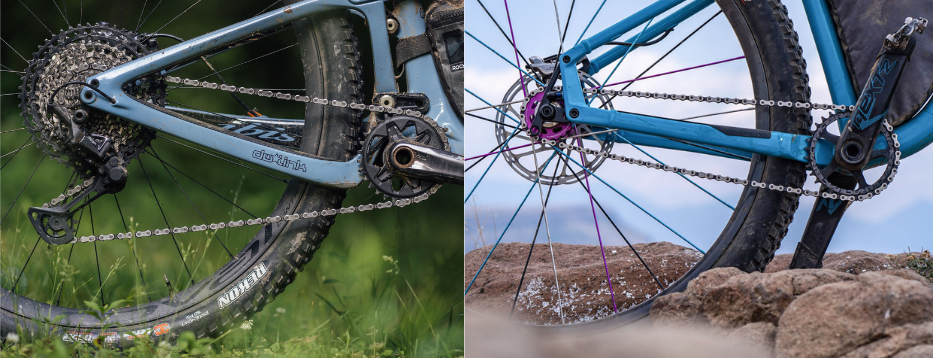
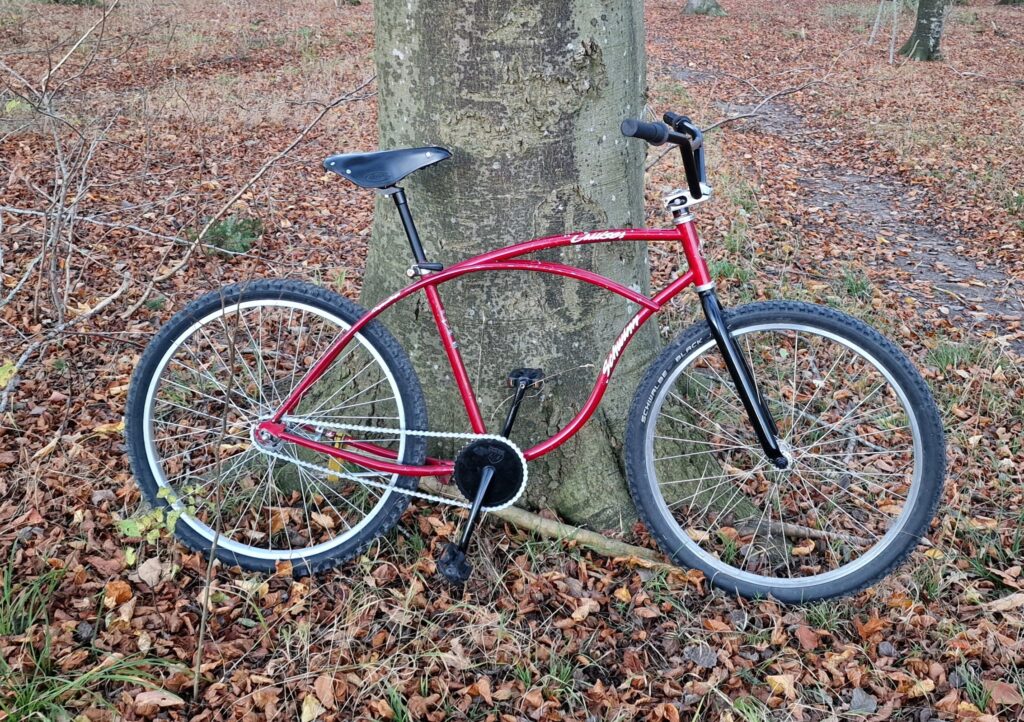
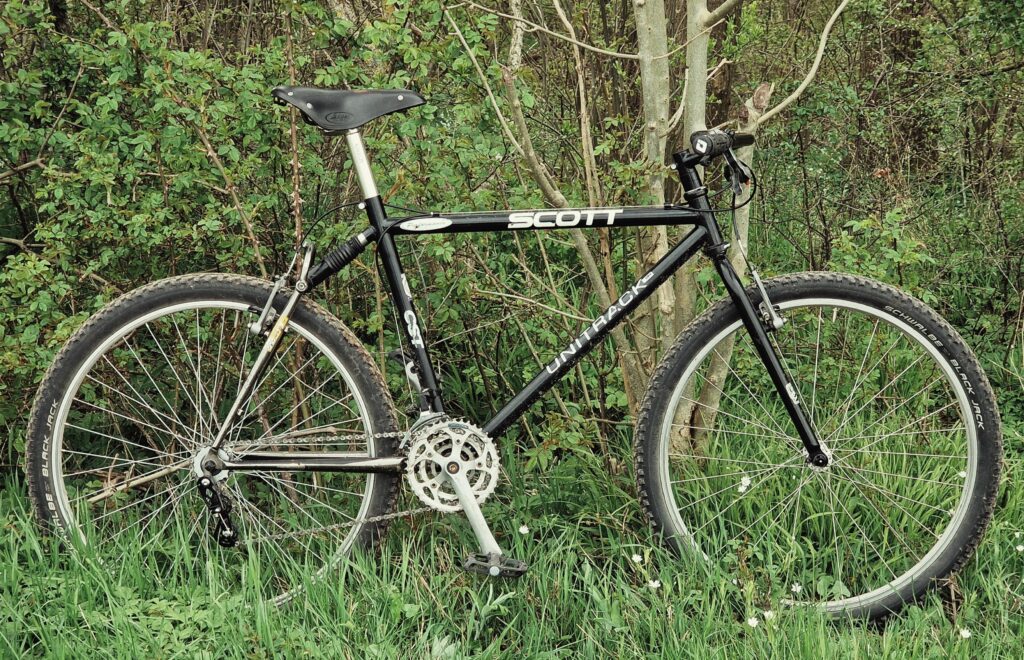
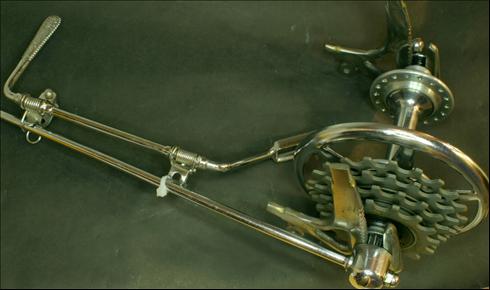
    So, where does this leave us in regards to the fabled 3×1? I wanted some first hand experience, and took to building one again. I perused my wide selection of willing victims, and decided that the Scott Untitrack DH frameset, which I was given for free, would be a perfect candidate. Few random throwaway bits, a cheap Chinese “Tanke” tensioner and ta-da! A pretty fun little machine for almost zero outlay. I certainly don’t ride it as I would a singlespeed or an internally geared bicycle, as I still need to mind the tensioner and occasionally make adjustments to the front mech. As mentioned earlier – it is a pretty much just a very primitive iteration of my other geared bicycles, but that is not necessarily a bad thing.

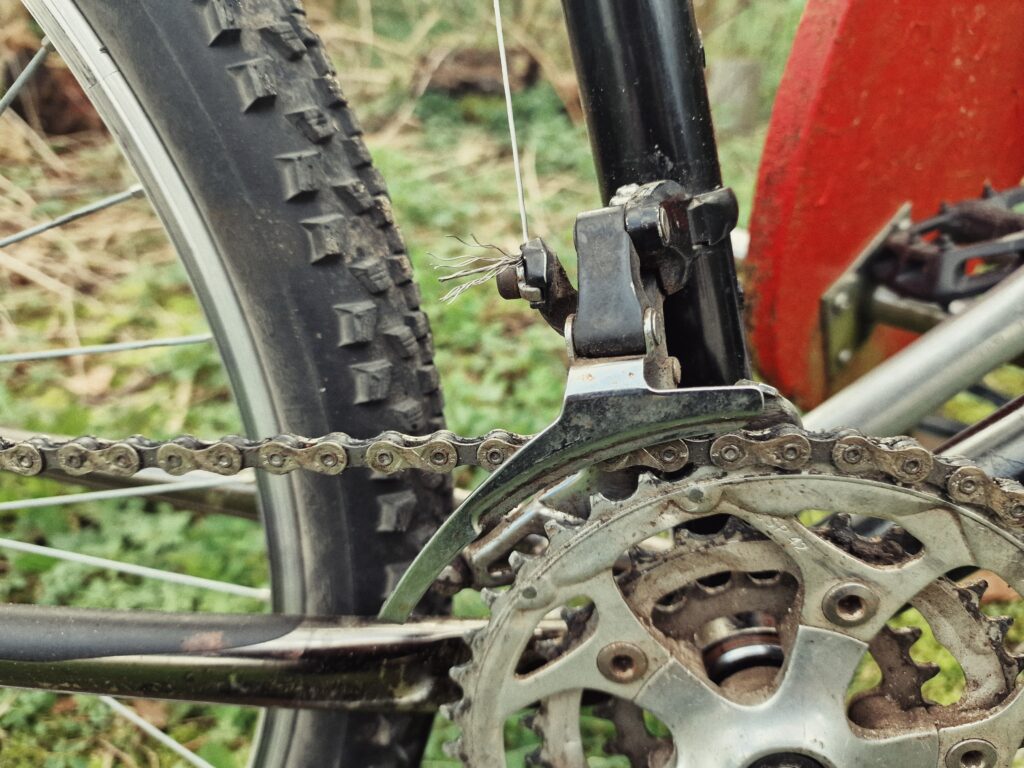
    The main benefit of a 3×1 is that I only have to contend with one shifter to get a useable range which is vaguely reminiscent of my 3 speed internal gear hubs. It is also lower maintenance as the rear doesn’t shift, there’s no cassette to grind down, and single cogs cost nowt and last practically forever. A front mech isn’t very prone to failure, sees less wear than a rear derailleur and is inexpensive to replace. And of course I’ve got no end of cheap triple cranks laying about so I’m sorted in that regard too. As such I do see it as a lesser chore than maintaining a classic 3×7, but it can’t hold a candle to the low maintenance and reliability of a singlespeed drivetrain or an internal gear hub. So, that remains my main gripe, people pretending these setups could be a singlespeeding alternative. So, from here on in I’ll just bluntly denounce this as any sort of alternative, and instead approach it as a more barebones externally geared bike. Anyway, adding to my earlier point on consumables, I opted for the cheapest 7/8 speed chains available, and in combination with a friction shifter, I don’t see myself replacing the cable or housing for the front mech anytime soon. I actually reused an old worn cable and housing, because the front mech is not a fine tuned instrument. It’s one step removed from using your big ol’ thumbs to slide that chain over. But all things considered, there’s probably no real cost savings to be made here. Older 7/8 speed drivetrains generally don’t wear that fast and the parts go for chip money. But at least it’s a bit less maintenance, right?…….right?

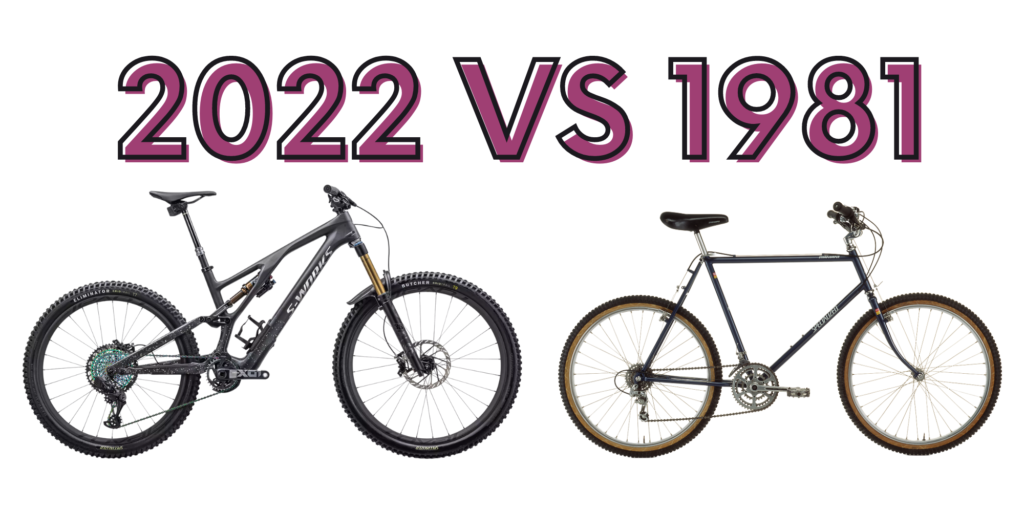
    As you can tell, I reserve a level of skepticism. But I also think alternative drivetrains are important to talk about. Because it does seem like people are becoming more interested in having less gears, realising that perhaps the number war is futile. Maybe what we need isn’t always more gears, maybe we need gears that work specifically for us. I personally love having fewer gears with large jumps, most likely a side effect of riding my 3 speed internal gear hubs a lot, and so the 3×1 ticks a box. It is less cluttered and gives a sufficient range for my kind of riding. I know that some people go even further, and add a cog or two in the rear, and shift it using the barrel adjuster or by limit screws. I have a lot of time for that, because finding gear combinations that work perfectly for you goes a long way in increasing riding pleasure. I have mentioned in other posts that I find a larger quantity of gears somewhat distracting. And so I can totally see the thinking behind stripping away what isn’t needed. I think it is just important to stay grounded and nuanced, as not to create this “best thing since sliced bread” mentality. And I must admit I do find it all a bit funny, as it is becoming clear to me that we are slowly re-inventing the wheel over and over again. It will not be long until someone tries to sell us a double crankset with a 3 speed cluster in the rear. 1930’s called. But hey… I love a 1/8 chain as much as the next man so bring it all back! The Cambio Corsa is next! (hint: sarcasm)

    Did have a certain level of charm, no?

    Speaking of double cranksets, I really don’t get the appeal of 2×1. If you’re going to the trouble of using a crank with multiple rings, setting up a front derailleur and using a tensioner – wouldn’t it make better sense to use a triple for a bit extra range, and enjoying more gradual jumps for an almost negligible amount of extra weight? I think so. But anyway, as we reach the final notes here, I am going to reflect on my experience thus far. I definitely think I will continue riding my 3×1 Unitrack, because it is fun and different. It lets a component, which is generally perceived as obsolete and clunky, shine. I think that’s neat. A front derailleur is perhaps the most primitive shifting mechanism, and to let it do the heavy lifting is a good testament to how beautifully simple a mechanically actuated bicycle really is. I think that in many ways the front derailleur is the component that deserves more credit, for not only does it just work – it is pretty much unbothered by anything you throw at it and can last a lifetime. And with just one rear cog to deal with, you don’t have to worry about cross chaining or finding the right combinations which is often when the front mech becomes a faff. See? Plenty of good things to say about this 3×1 malarkey. Just don’t go shifting that thing under load going uphill, crunch! That is a job for a rear derailleur. But seriously, 3×1 perfectly useable setup. Ideal for someone that wants to simplify their shifting. Maybe you want to focus less on shifting and more on riding, maybe you live in a place that doesn’t really warrant god knows how many gears. Maybe you’re just bored and have a mish mash of crusty parts and you fancy building something that requires the bare minimum.

    If you’re looking to do a conversion like this, I would recommend giving it a go first using that rear derailleur you likely already have lying about. Just dial in the limit screws to get it sitting near the middle of the freehub – may need to get longer screws, or clamp a piece of cable down and wind out the barrel adjuster. I would recommend keeping the cog relatively centered with the middle ring to give the crispest front shifting, but it’ll likely do OK with more inboard or outboard positions. Chainline is far more crucial with narrow modern chains, and their cassettes.

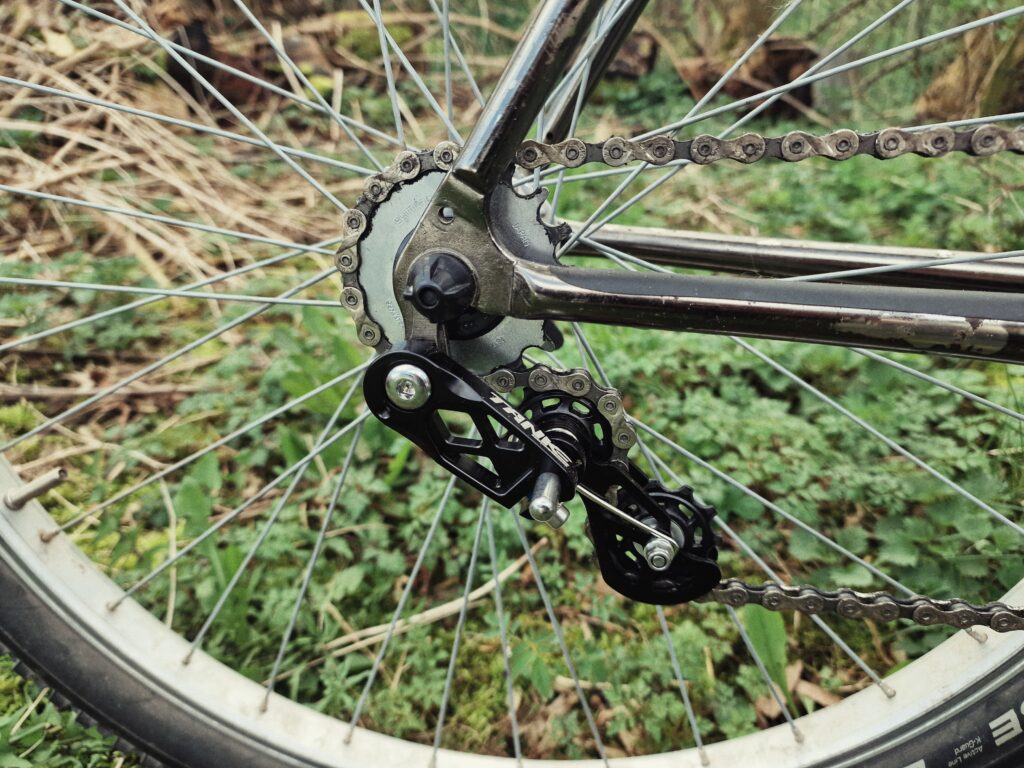
    Now if you’d prefer to have a dedicated tensioner, all you need to look for is a double pulley one as they usually have more sprung range to accommodate the gear jumps. You could probably use a sprung one-pulley tensioner for a 2x, but the double pulley type tends to hold the chain more securely and some of them are even decided to handle front shifting. Inspiration:

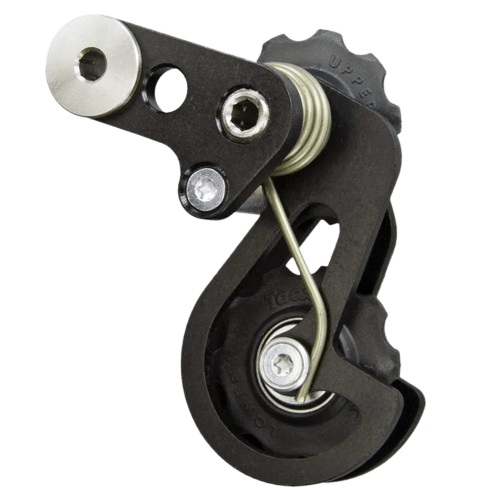
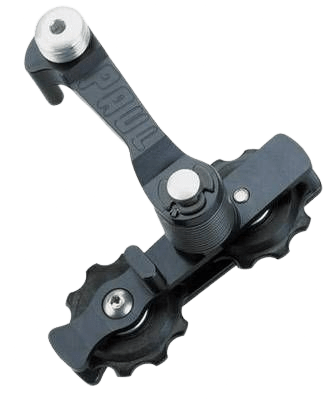
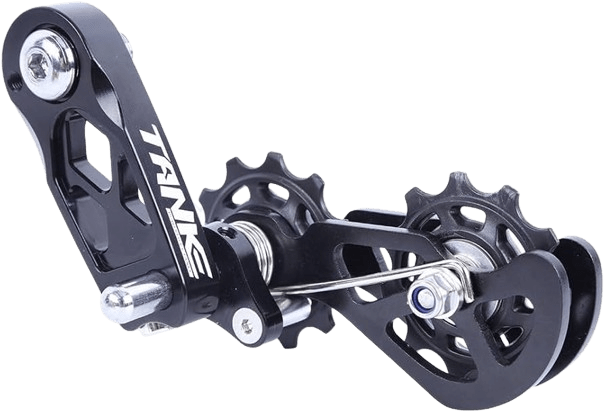
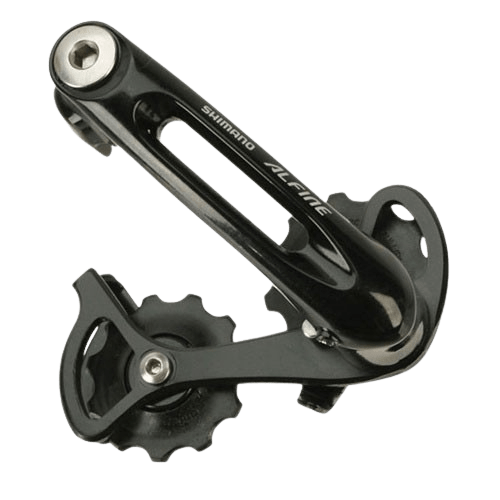
    I was going to use my Alfine, but adjusting the chainline on that is daft, using washers. The same thing really goes for the Rohloff and Melvin tensioners, they rely on washers too – for the Melvin they go on the pivot point. The one I decided to use, the Tanke, which I got cheap on AliExpress, simply clamps unto a metal rod ala the classic Surly Singleator. I like this better for easy adjustment.

    Happy wrenching.

    . . .

  • Single-Speed Confessions – How Many Gears Do You Really Need? (Nexus 3 Experimentation)

    I can’t remember the last time I had a geared bike. Well, that’s what I used to say. As the title alludes to, I’ve finally gotten around to gearing one of my bikes. It wasn’t an easy decision, having run all of my bicycles as single-speed for as long as I can remember. And I think it’s safe to say that there’s an element of defeat in ‘regressing’ back to a geared setup as a devout single-speeder, and if you’re a fellow 1×1’er – don’t nail me to the cross just yet.

    Ditching the Gears, why?

    I want to give a little bit of background before I get into my gear experimentation. I went single-speed yonks ago, and some of you may be wondering why I ditched gears in the first place. The reason was derailleurs. I could never get along with them, I found them a struggle to setup in a way that didn’t require constant maintenance. I still stand by that, by the way. Derailleurs do the job, but being an external component that protrudes from the frame, there’s a risk of bending or completely snapping off your derailleur on rocks and roots. Another negative is that the shifting can be directly impacted by dirt and grime from the environment and cable stretch, and last but not least, it looks awfully clunky and is far noisier than a single-speed setup.

    A comparison between a multispeed external geared bike and singlespeed

    I also found that derailleurs seem to be impacted a lot more by load, and as a heavy rider, I have been able to flex a frame enough to get the chain skipping – on more than one occasion. Mind you, I used older pre-clutch derailleurs, so perhaps that could have been a factor?

    Regardless, I definitely am not a fan of the external gear setups, and that was why I went single-speed. The simplicity of having one chainring in the front and one sprocket in the rear allowed me to commit more to the ride, by taking the need for shifting out of the equation. My theory is that for some, like myself, the gear options can destroy momentum and drive. Focusing on which gear you might need for an upcoming hilly section, or a downhill section, can be a chore. Especially as you crunch through the cassette, desperately trying to find the sweet spot. And the more gears, the more spoilt for choice you are – a true headache, akin to picking a film in the day and age of endless on-demand streaming.

    So, to sum it up, single-speeding has less room for failure and results in a tidier, less cluttered appearance while allowing you to pedal more directly, with basically no drag at all. A perfect setup for a person that wants something that just works, with minimal need for maintenance.

    Blasphemous Experimentation

    So, I’ve sat here praising single-speed bikes for what feels like an eternity and your glass is half empty (or are you an optimist?) and you’re thinking.. Surely the answer to the post title is ‘one‘. But bear with me, although I firmly believe that one cog is all you really need, I won’t deny that having multiple gears is a welcome luxury. Though I’ve ridden single-speed for a long time, there has been moments where I’ve thought: “Would be nice to have an easier gear for this hill” or “Would be nice not to spin out on this flat section“.

    And I think I’ve cracked it. The cure for my knee-cramping blues is true blast from the past, a gearing system that pre-dates the derailleur, a gearing system that, to many, is seen as a only worthy of a utility bike – not an off-roading racy beast. Any guesses? If you thought: He must be talking about internal gear hubs, then congratulations. There’s no prize as we’re on a budget here, but know that you’re awfully clever.

    I looked into various internal gear hubs, and quickly determined that what I needed was a 3-speed hub. There are many options these days. I was utterly shocked when I discovered that you can get an Alfine 11-speed hub! Obviously I knew of Rohloff speedhubs, which offers 14 speed, but pricewise neither the Alfine 11 or the Rohloff were viable, and so I decided not to include them in my considerations at the time. I also knew that the Alfine and Rohloff offered too many gears for me personally, as another element of geared bikes I didn’t enjoy was the constant hide-and-seek you had to play, until you found the right gear for the terrain to come. It’s important to remember that having many gradual gear jumps is really only a concern for someone who needs to keep a strong cadence while road riding, and so applies less to us mere mortals.

    With 3-speed, the middle/second gear is ‘direct drive’. What this means is that in the second gear, you are driven by the physical sprockets, and the planetary gears inside the hub aren’t engaged. This means that in direct drive, you essentially have your preferred singlespeed gearing. Perfect. Now the question is: Which hub am I getting?

    Sturmey Archer, SRAM or Shimano?

    I had a pretty tough time picking the right hub for my needs. I knew that Sturmey Archer would be a safe bet, as many folks have proven their resilience, and for a while that was the route I was going. A huge positive is that Sturmey Archer hubs can be purchased new still. Shortly after I then obtained a bike kitted with Sachs components and for a while I thought maybe that was the right direction, but I’d have to scour the used market, unless I decided to go with SRAM (who purchased Sachs). But I was getting eager to experiment and I knew that neither Sturmey or SRAM would be easily available here. So, I opted for a Nexus Inter 3 hub, primarily because the hubs are incredibly cheap and very accessible. It should be noted that I had also heard rather good things about the durability of the ‘Red Stripe’ Nexus 3 speed, as a matter of fact there’s a fair few mountain bikers on MTBR who’ve ridden the Nexus 3 offroad for years.

    That said, I admit that the purchase wasn’t without plenty of doubts and concerns. When I think of Nexus hubs, I usually think of lower end aluminium commuters, unlikely to last for any sort of riding that isn’t short trips to-and-fro the shops. There’s something rather disposable about the Nexus hubs, being kitted on anything from absolute gutrot selections in the hardware store to overpriced alu lumps at the LBS. But I wasn’t deterred by that, and on a drunken night I installed the Nexus 3 speed kit on my Cross Check.

    My Nexus 3 kitted Cross Check with coaster brake and front v-brake. How clean is that?!

    3 speed, all you need?

    I am not willing to abandon my single-speeding ways, let that be known! But with that being said, I think if I were to approach the aspect of gearing with a fellow single-speeder, this would be the way to go. Why? Well, because 3-speed shares the simplicity that attracts people to running 1×1. Sure, the hub itself could fail and then you’d have a big of a repair on your hands, but as far as internal gear hubs go, 3 speed is definitely one of the simplest. This means that a laymen wrencher could potentially take it apart and repair, in contrast to something more complex like an Alfine or, god forbid, a faulty Rohloff. And should a Nexus 3 hub fail – after years of use – they’re affordable and plentiful both used and new. But it wasn’t just the durability that I was attracted by. A fantastic thing about having only 3 gears is that it doesn’t clutter your way of thinking as you ride, you’re not concerned about finding the ‘right gear’ in the same way you are with, let’s say, a modern 11/12 speed setup.

    With 3-speed gear hubs, you’ve got the uncluttered, clean feeling of a single-speed, with just that bit more range. You don’t have to fish after the right gear, but you also don’t have to suffer through it. Even though you might have found the perfect single-speed gearing that allows you to handle both climbs and the flats, there’s no doubt that you’ll have times where you wish you had that bit extra range. With a 3 speed you get to have your preferred gearing as the direct drive (middle gear) on your shifter, but should you ever need it, you’ll have a slightly easier gear to handle those tough climbs, and should you find yourself spinning out, you’re got your harder third gear to handle that. As a result you’ve got the versatility of a geared setup, without the guess-work of a more excessive multi-speed setup.

    So, it’s safe to say that my experimentation has led me to one discovery: Geared bikes don’t have to be a dead-end of maintenance and clutter, and they can improve your riding experience significantly. I still feel like I’m on a single-speed bike most of the time, and should I suddenly feel my legs seizing up on a particular rough climb, I’m just one click away from Nirvana. To get an idea of the sort of range you’ll have, you can quite easily emulate it on a bicycle with a front derailleur. If you have a triple setup, the gear jumps on a 3 speed hub gear is going to be similar to that of your three front rings.

    Low maintenance? How low can you go?

    I did shortly brush over the lower maintenance needs of internal gear hubs compared to derailleurs, and how it bears resemblance to the lack of maintenance required on singlespeed bikes. Due to the fact that an internal gear hub doesn’t rely on multiple cogs, the wear and tear is very alike that of a singlespeed bike. With a derailleur the chain has to move from sprocket to sprocket, which causes faster wear of both the chain and the sprockets themselves. On top of that multi-speed chains are more expensive and so is a cassette in contrast to a single sprocket and chainring combination.

    Singlespeed bikes have one sprocket front and rear, and typically use a burly 1/8 chain, identical to an internally geared bike. So, in that way there’s really little difference between an internal gear and a singlespeed drivetrain on the surface level, the only real difference is additional weight from the gear hub and the possibility of the internals of the gear hub failing. You will also have to do occasional maintenance of the gear hub to ensure it’s indexed properly. This is done by popping the hub into the second gear, the “direct drive”, and aligning the little yellow dot between the two yellow lines, using the barrel adjuster.

    Properly adjusted Nexus 3

    Obviously you will also have to occasionally replace the gear cable as it stretches, but overall the maintenance needs of a 3 speed Nexus hub is negligible. Many have run these cheap hubs for years with little to no adjustment or maintenance on commuter bikes, which see a much rougher life than people assume in the cold, damp conditions of Northern Europe. And as mentioned earlier, should your Nexus 3 fail, it is likely that you’d be able to take it apart and repair it yourself, because in contrast to IGH with greater speeds, such as 5/7/8/11, the humble 3 speed has far less complicated internals. That’s partly what makes it so bombproof.

    Internal gubbins of a Nexus 3 coaster braked hub

    A Few Finalising Notes

    Before I wrap this up, I do want to just add a little bit of information which may be of use to someone considering going for a a Nexus 3 hub. Firstly, the Nexus 3 unfortunately only comes with a gripshifter, which means that if you’re on a road bike using drop bars, you will need to find a different way to mount it. An example could be to use a HubBub adapter which is essentially a bar end expanding plug that a gripshifter can be clamped unto. You can also try to use a friction shifter, as 3-speed hubs only really have 3 positions and only one of them is crucial. 1st gear is cable slack, second gear is a set indexed position where the yellow dots align (refer to the picture of adjustment further up) and the third gear is cable tight. So, with friction shifters you’d just have to learn how to find the second gear consistently.

    If the gripshifter is a problem, I’d recommend going for a Sturmey Archer 3-speed hub, as they do offer a nice little thumb shifter. There’s reports of these Sturmey Archer and Dreigang thumbshifters being used on Nexus 3 units, and I see no reason why it wouldn’t work. The most crucial thing will always be to ensure that the second, direct drive, gear is properly indexed.

    Another little bit of information that some of you may find useful has to do with braking. As mentioned earlier, I opted for a coaster braked hub. It is possible to get a disc braked Nexus 3, but they’re a lot pricier and harder to come by. At least here in Europe. I personally quite like the coaster brakes, but if you have a vertical dropout frame, you may run into issues as using tensioners don’t mix well with coaster brakes. And obviously some people might have a hard time getting on with a coaster brake. But fear not, an option is to disable the coaster brake and use v-brakes or cantilevers, provided the wheel has a braking surface and the frame is able to run rim brakes. This is a simple procedure that I’ll provide more information about in an a separate post soon.

    . . .

  • Let’s Think About Bars

    When I got into wrenching on bicycles, I primarily worked on 90’s and early 2000’s mountain bikes, because that particular time period caught my interest. I liked the frame geometries offered, a nice blend of slackness and aggressive raciness. There was a lot of experimentation going on as well, but in spite of that there were definitely some set standards. And purists stuck to them – and still stick to them. We’re talking the classic NORBA geometry with the arse pointed up at the sky and your back extended to the point where you wonder if, given another hundred years, would we see an evolutionary leap occurring in retro mountain bike enthusiasts and roadies, doubling the 33 spinal bones that the human body already lugs around?

    Probably not.

    Example of early MTB riding position

    That said, I am one of those folks that quite like the look of a stem long enough to be used as a jousting pole combined with a very narrow handlebar. I rode that for ages, and I particularly liked the twitchiness of narrow bars. I felt I had a level of control that the current trend of sluggish wide bars simply cannot offer. For some that twitchiness is scary, and most people advocate against narrow bars for off-road now, but for me it allowed me to make very incremental changes to my steering, and I didn’t have any worries about bashing myself into stuff during particularly narrow sections of trail. Unfortunately that doesn’t change the fact that the NORBA tradition did my back in. Still does.

    My Rockhopper sporting a long Syncros stem, my back hurts just looking at it

    Hoping to find a way to rekindle things with my spine, I did some research. After many encouraging statements from various users on a plethora of online bike forums, who voiced similar concerns, I was inclined to begin experimenting. I felt the stars had aligned, as around the time there even seemed to be a fair few cycling YouTuber’s chanting a whole new mantra; “A bike should be comfortable“. Comfort? Eugh, what’s that? Won’t that ruin the unspoiled aesthetic of the bike, making my toes curl up in utter cringe as I take the obligatory mid-ride sideshot? Yes, possibly. You will probably be laughed at by purists, driving them to making silly newspaper cutouts with your name alongside horrendous threats of great violence. Alas, that’s the price we pay for being different.

    I ventured into the dark side of things when I decided to put risers in combination with a longer stem. With this bike, I didn’t mind the reach so much, but the drop itself from saddle down to bars was a bit too much. The result was a Surly Sunrise bar setup with a 100mm-ish Thomson stem on my Surly 1×1. It felt great. And when I realised that the world didn’t spontaneously combust in front of me, as I tightened the clamp down, I was hooked. I knew I had to try a different setup on another one of my bikes, because the night is young and I always have great ideas when I drink. I am a changed man, I now believe a bike should be a fluid, everchanging thing. I don’t believe in staticness anymore. It’s boring and it is limiting. In this day and age we’re told to buy 10 different bikes for 10 different disciplines, but we’re forgetting the fact that at the end of the day we’ve got a frame at the heart of everything, and if we dare, we can put just about every component we wish unto it. In other words, seeing the bike as more of a tool than a fashion statement greatly increases its versatility and allows us to experience many different ride qualities without having to buy a new bike. And remember, although there are many proprietary standards in today’s industry, many older industry standards still prevail, and as such even your old ride can be treated to just about any component of today.

    My first alt-bar venture, 1×1 with Sunrise bars on a longer reach Thomson stem

    Oh dear, went off on a tangent there didn’t I? Of course we’re not going to talk groupsets and other nonsense today. We’re specifically focusing on bars, because they can truly transform your riding experience with very minimal effort on your end. But even though that is the case, and even though the leisure cycling industry is booming, there’s still a reluctance to stray away from ‘what everyone else is doing’.. What happened to the unique, the individual? What happened to punk rock?! Aaargh!

    But all hope is not lost, because when you look online for handlebars, you’ll eventually run into a fringe of nutters that traverse all the different riding cultures, they blend and bastardise as they see fit to get something rideable and comfortable. The terminology used to describe is “xbikers”, and although I’d love to sum them up with words – a picture speaks a thousand words, so I refer you to this subreddit. The xbikers alongside the bikepackers are very much the driving force behind the “alt bar” (alternative bars) movement online, which consists of everything from BMX, MX bars, backswept bendy bars, altered drop bars and other funky things. The market is still very niche, probably due to the general belief that making your ride, say, more upright, is going to make your bike incapable of riding anything but the street by your gran’s sheltered accommodation. But that’s not the case. Sure it can have negative impacts on climbs, by not allowing you to weigh down the front end enough, and dependent on width it can make steering sluggish. On the flipside it may also have a positive impact on your overall riding comfort by giving you a more relaxed position on the bike and more hand positions to spruce things up a bit.

    Alternative Handlebar examples

    For me, high rise and backswept bars has been a winner. I’m loving the more upright riding position, and when I say upright it doesn’t have to be sitting on the porcelain throne Dutchie riding. But it can be, to each their own. I’ve found that being able to sit upright allows me to take in more of my surroundings, which is one of the main reasons why I cycle, and honestly the bike feels no less capable. I still troop through the root infested singletrack, I still (try to) climb steep inclines, I ride all the things I used to ride, with the only difference being that, at last, I’m actually comfortable. Another positive is that it has allowed me to be a lot less picky about frame sizing, and I now rest easy knowing that I can get a good fit simply by playing around with various different bar and stem combinations on my builds.

    Now, I should note that although I am kind of promoting the ‘alt bar’ movement here, I do have some reservations about it. The reason being that to me, alt bar, refers to any handlebar that doesn’t conform to the norms and traditions, so alternatives to low rise, flat bars and drop bars. But it’s important to understand that what we refer to as “alt bars” include many handlebars that were commonplace on commuter bicycles going back a century. The homogenisation of handlebar setups is a relatively recent occurrence. My concern is therefor that the ‘alt bar’ is just another attempt at profiting from reinventing the wheel, where instead of promoting the use of the many cheap commuter bars out there, we have a determined bunch of companies essentially selling basic backswept cruiser bars, or porteur bars, at an incredibly high price, marketed as something ‘new and groundbreaking’.

    But with that said I’m happy that people are taking the fight to traditionalist, purist views within the bicycle world. And I am all for the experimentation. A project I’m personally hoping to realise soon is a MTB with Porteur bars. The extreme backsweep of those will allow me to go ultra-upright and I’m curious to see how they’ll do offroad. My theory is that the long backswept handles will function a bit as a bouncy lever, with a suppressing effect over bumpy terrain. I’m basing this on my experience of the Porteur bars on my ’49 German Randonneur, which have a lovely natural flex to them.

    Last but not least, another important aspect of handlebars to consider is that they come in various different materials. You’ve got your aluminium, steel, titanium, carbon, and if you’re feeling a bit exotic, magnesium handlebars. I run a mixture of aluminium and steel myself, and have a preference for steel handlebars. But I also have bikes where I think aluminium works better. Aluminium is more rigid, and steel has a natural flex to it. I’ve found that stiffer frames (aluminium, lightweight steel) benefit from steel bars, to soften the ride a bit, as very stiff frames have a tendency to bounce too hard on bumpy trails. In contrast a more flexy, heavy steel frame such as my plush, flexy Karate Monkey or 1×1 feels great with a set of MX aluminium bars, because they stiffen the front end and allow for greater control and a better, more direct, feel of the ground in front of me.

    So, to conclude, stop being a bore. Stop sticking to traditions. Try things. A bar swap is one of the most basic bits of wrenching a person can do, it takes the same amount of time as downing that bottle of lager you’re holding in your hand. It’s a simple thing that can completely transform your riding. It can even save that old frame you’ve outgrown and make it rideable again. The world is yours.

    And don’t get me started on the beauty of bar-ends.. We’ll tackle that in a separate post sometime..

    . . .

  • Why You Should Have Gone Klunkin’

    If I told you to stash your modern full suspension 29’er with 170mm travel, hydraulic disc brakes, dropper post and electric shifting in the back of the shed, and handed you an old curved lump of steel, weighing in at around 40 to 50 pounds, while egging you on to take it out unto the trails, would you do it? Probably not. And why should you?

    One of my recent joys in the world of biking has been to practice, the perhaps oldest form of cycling: underbiking. If you’re unfamiliar with that term, it can be summed up like this: riding a bicycle on challenging terrain that it wasn’t designed for. Obviously that’s a slightly ridiculous statement as the invention of the bicycle predates paved roads, and they probably all used to do a fair bit of off-road riding – if anything it might have been the primary type of riding.

    Buffalo soldiers riding to Yellowstone

    My fascination with older off-road bikes used to be satisfied by building up 90’s mountain bike frames from time to time, but recently I wanted to try something new (and very old). As a result I recently realised my dream of building a ‘klunker’. Basically an old beach cruiser frame converted for off-road use by putting on knobbly tyres and a set of cruiser or MX bars. It’s still got the coaster brake on and everything, and as of now it’s set up as a single speed. The frame I used is a Schwinn Cruiser, but not a Chicago Schwinn, it’s one of the later European ones (late 80’s), made in Hungary. It’s a proper lump though, so still true to its forebears,.. I can’t park it near the harbour for fear that the local sailors may nick it as a boat anchor replacement.

    My Klunker

    Now, with that rather discouraging introduction, why do I want you to take this heavy ol’ boy to the woods? Well, mainly because I think cycling is about having fun and being able to experience the outdoors in as many different ways as possible. On a modern 29’er, with all the modern thingymajigs and thingymabobs, you can breeze through incredibly challenging and rugged terrains with ease, and as with everything to do with ‘modern mountain bikes’, speed is king. Now I’m not saying that the early mountain bikes weren’t designed with that in mind, because they were – fast was king back then too. But that’s exactly why I want you to try hucking a lump of pig iron around the woods. Because fast back then isn’t fast now.

    These modest old machines are a chance to slow down and appreciate your surroundings, to be attentive, to feel every bit of the trail in front of you. And there’s no shame in getting off when a climb is ahead, it’ll allow you a bit of a breather and you can take a look around you. Chances are you haven’t actually appreciated the woods in a long time – because your mind was elsewhere. On a barebones bicycle, like an old coaster braked cruiser, you’re at the mercy of the landscape in front of you. It’s humbling and it’s exciting at the same time, because even the most timid sections of singletrack, or a fireroad, can provide a challenge.

    Not to mention the beauty of simplicity that you get with a bike like this. It isn’t be a showpiece, it doesn’t need fancy anything, it’s a flathead screwdriver and a hammer kind of job. You don’t have to worry about the paintjob, covering it in sticky helicopter tape while neurotically checking for scratches. You don’t have to adjust anything because everything ‘just about’ works. Even if it doesn’t work, you just make do! You’ll hate your knees going uphill, you’ll never find a comfortable footing for bumpy sections where the coaster brake won’t do your nut in, but once you get to the crest of the hill, all your woes will be forgotten, as that lardy old boy soars to the bottom – with or without you.

    If none of this is enough encouragement to get you out klunking, then perhaps I can entice you by explaining to you just how cool you’ll look. Check this out:

    If the prospect of looking like a rugged mountain man or woman, dressed up in plaid shirts, jeans, and the obligatory pair of leather boots isn’t enough for you – then I don’t know what to say. You’re a lost cause.

    And on a final note, some of you may be reading this, thinking to themselves: ‘Hold on a hot minute, he’s saying that his cruiser with plush 2.0″ tyres is an example of underbiking’. Well, in this day and age of plus sized tyres and suspension so capable that a rock garden feels like a cluster of pebbles, I’d say it is a form of underbiking to be riding an old heavy boat anchor with nothing but a coaster brake and a 12 pack in your bloodstream. Modern off-road bicycles are capable of feats that could only have been dreamt of 40-ish years ago when the first ‘mountain bike’ was born, and therefor a converted Schwinn Cruiser fits perfectly under the umbrella of the term ‘underbiking’. Even if it’s on 2.0 knobbly tyres.

    But if you want the real gorgonzola of underbiking, I’d recommend doing what people did for ages – take your old road bike into the woods and up into the mountains. It’ll be fine. You could even, if you fancy, go ahead and build yourself a ‘Tracker’. In Britain there weren’t really ‘klunkers’ back in the Pre-MTB days, but that didn’t mean they didn’t do off-road riding. You’ll find many examples of old road bikes kitted with MC bars and as fat a tyre as the frame allowed. The result is a British ‘Tracker’ bike, a European predecessor to the early commercial Mountain Bike scene.

    . . .

Meet Chris. A professional catdad riddled with bike hoarding disorder and compulsive wrenching disorder. I ride (poorly), build (badly) and try to document my doings to my best ability in the online realm.

On my website you will find my bike musings, build journals and resources that may be of use to you. Or maybe they’ll send you down a perilous path and leave you stranded in a knowledge vacuum. I know that I know nothing.. or whatever.

Designed with WordPress